Monday, December 13, 2010

Ramblings for A Winter Day


I know I've shown this stamp before, but if you're looking for a fast and easy winter card try a plaid background with alcohol inks on gloss cardstock. To create the plaid effect use your felt applicator and make vertical and horizontal wide and thin stripes in single colours.  For this background we used Celery and Stream from the Tim Holtz Distress Inks.  Remember when stamping on top of an alcohol ink background you will need to use a water-proof die ink (Not Stazon).  Ranger's Archival Ink is a good choice.


After last week's snow storm here in London a statement like "think snow" should be forbidden. However, I like the look of this card for a masculine birthday or greeting card.   This great image from Northwoods has been embossed and coloured with Tombow markers.  Embellished with a mylar snowflake, and a gold cord for the sled rope. 


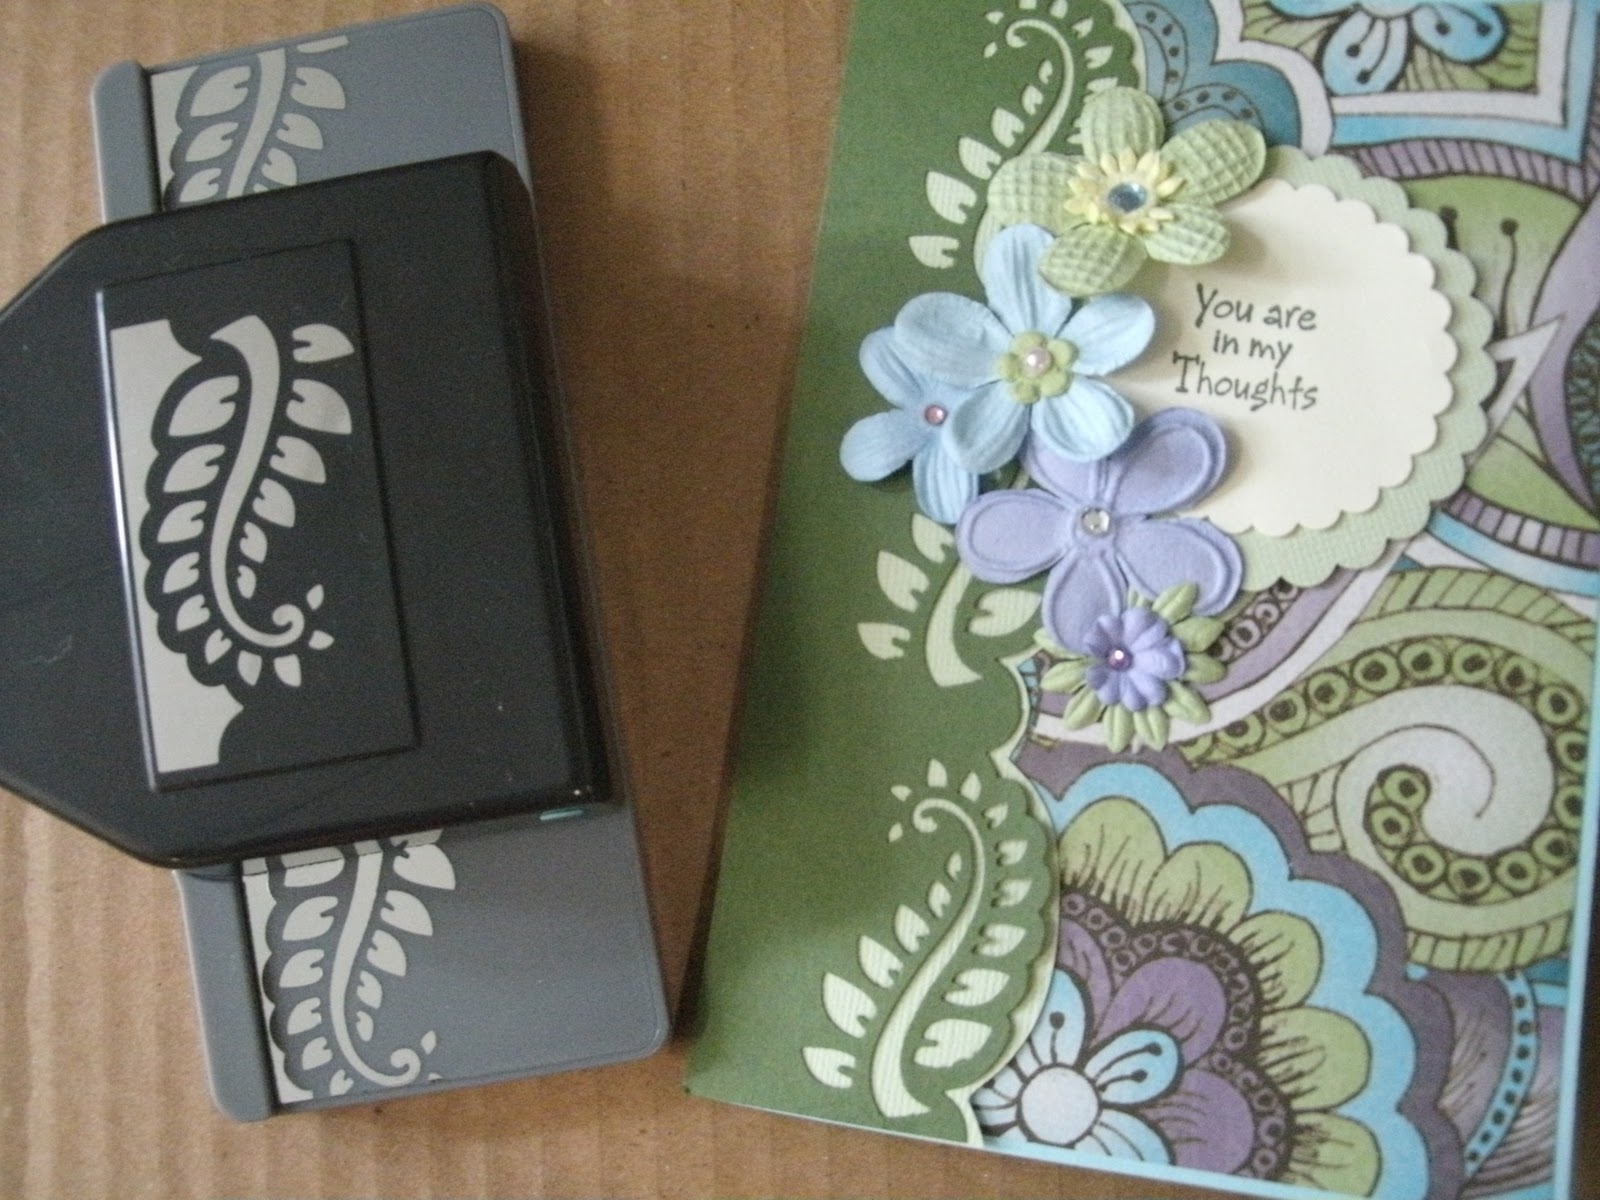
For those of us already wishing for Spring, I had to show you this new embossing folder from Crafts-Too.  I love the open line daisy combined with the dotted scroll.  There is still time for you to put this on your Christmas wishlist.  Only $6.95.
 
We're getting down to the crunch.  Two weeks from today and the Christmas holiday will be all over.
Happy Crunching.

Thursday, December 2, 2010

Christmas Open House

Just A Reminder

Please come Join us on December Saturday 4th, from 10:00am - 3:00pm we will be celebrating our Christmas Open House with make and takes, refreshments, and even more great deals. As usual, the store itself will be open till 5pm.
Hope to see you soon,

Happy Stamping.

Friday, November 26, 2010

Just a Little Note

There's a few things going on in this card to describe.  First of all, what does one do with a lot of left over ribbon?  I love this heavy duty punch from EK Sucess which allows you to easily punch through two or three sheets of card at the same time creating a thin rounded rectangle slot, (shown in the 2nd picture below), to slide ribbons through.  Secondly, when I'm hand colouring a solid image stamp with markers, (one of my favorite things to do), this is an easy way to use some of your printed papers. 

 The stamp used is Floral Silhouette 2 by Stampabilities.  It was so easy to choose some shades of green markers to work well with this background paper by Magenta. 

Don't forget that tommorow we have a "We Pay The Taxes Day" on everything in the store plus a few other deals. If your not already on the newsletter, you can check this out at http://www.stampart.ca/. Look on the homepage, bottom left.  And next saturday December 4th is our Christmas Open House. Look for more details to come in our new upcoming newsletter.
Happy Stamping.

Friday, November 19, 2010

Here is the card I promised made with the Hello stamp from the TPC clear set of greetings (Shown earlier). We have used Broken China and Spicy Marmalade Distress Inks with the Tim Holtz Blending Tool onto water colour paper.  The image from Crafty Individuals has been stamped twice along the bottom and white heat embossed.  I cut off the butterfly from the rest of the stamp to prevent it from showing up twice in the same location.  This way you can also add more butterflies to your final image wherever you want to place them.  We made a paint from Rangers' white Opal Pearls and water and lightly brushed over the surface of the card.  Next, we spritzed the entire front panel with some Perfect Pearls and water in a Mini-Mister.  This technique really creates a Pearlized finish on the card face. We tore off the top edge of the cardstock and actually used it inside.  The Hello has been stamped in the Rangers' Stream Ink and the Nestabilities shape behind the Hello is Labels #4.  The gold dragonfly brad is just a fun touch for any floral card.

See you next week,  Happy Stamping!

Monday, November 15, 2010

New TPC Studios Sets

These are some of the new clear kits from TPC Studios.  Especially for scrapbookers who are looking to complete pages of their children's sports activities.  The following kits are available in Football, Baseball, Soccer and Cheerleading (This American company has not made a Hockey set). 

Here are some cute kitchen bits and scribble flowers. 

This kit of scrolls (on the left), has such a nice variety of sizes that I'm sure you"ll find the right one for your project.  The Granda's Attic set includes great designs for your distressed collages.


Last but not least, the lovely fonts and scrolls in this salutations kit can be used simply as a lifted label on printed card stock for a fast card.  Sorry theres no card sample right now, we're still playing catchup.  We'll aim for another blog towards the end of this week.

For those of you who have been dissapointed when trying to register for our fun morning, we have now added a wednesday afternoon class from 1pm to 2:30pm. Please call the store to register, the price is $5 +H.S.T. for this one card class.

Happy Stamping.

Monday, November 8, 2010

New Mini Clear Stamp Kits from KaiserCraft

The following pictures are just some of the new kits from KaiserCraft.  Some of the fonts are extremely delicate and need some practice to find the correct pressure.  You'll find this holds true of many of the polymer stamps.  The best recommendation for ink would be Versafine.  Firstly, this hybrid pigment clings well to the polymer material, unlike straight dye inks; and it also is fine enough to keep the tiny lines clean.


Here are a few Christmas designs to add to your collection.  At $2.98 each you can forgive yourself for splurging on more Christmas stamps.  In particular, the salutations are a very nice size to fit into tight spots. 


The flower cluster and the heart tree are just waiting to be coloured with your choice of colouring medium.  Although they are fairly small, the flower cluster measures 2" x 3", they will still make a nice focal point.  There are even more kits then I have displayed here.  Wonderful scrapbook sentiment 'Treasure These Memories", and more salutation kits. 

Hope your Christmas card designs are coming along as quickly as you've hoped.  Keep us in mind, we still have a store full of Christmas stamps.

Happy Stamping.

Wednesday, October 27, 2010

Think Spring! It'll be back before you know it!


This is a card that was done in class, and we had a recent request to put it up on the blog.  The back single card (blue panel) is 4 1/4" x 5 1/2" and the parchment card tri-fold is 5 1/2" x 10 1/2" (scored at 3 1/2" intervals).  The branch was stamped multiple times with Versafine's Sepia and we've used the bushy branch from the kit below. The small verse is from Impresssion Obsession. With the first two panels folded together, we used a Whale Of  A Punch Oval. Feed the punch in from the top as far as it will go, and punch through the two layers at once. Pencil through the open oval onto the third panel to frame where the verse will sit. 


Using the McGill Botanicals Bird punch, punch out several robins using different colours of velvet paper.  Don't forget to punch some of them from the backside of the velvet so you can change the direction that the bird is facing.  The tree kit below is called 'Delicate Branches' from Inkadinkado.  We used the top branch in this set.  We added green colour with a Sakura's Metallic pen.  With the parchment folded as shown, attach to the back blue panel.  I hope this helps, Esther. :)

Sorry for the delay.  We've been busy with Workshops and our visit from Stacy Rich of Stacy Stamps. We'll see you again shortly. Happy Stamping.

Friday, October 15, 2010

It's beginning to look a lot like Christmas Cards!

I made the easel card below with Hero Arts people at CHA in Chicago in July.  The stamp kit is a cling-mount called 'Enjoy the Seasons' and there are 3 snowflakes stamps and the sentiment.  It sells for $12.95.  The shape was made with the Tim Holtz Alterations die from Sizzix called 'Styled Labels'. We used die inks and misted them with a solution of water and pearl coloured Perfect Pearls so that the snowflakes glisten as the ink dries.  A very nice effect for wintry images. The background on the card was made with Hero's 'Magical Background'.  A lovely large cling stamp (4" x 6") covered with dotted scrolls, sells for $11.95.


This is a nice winter village scene from Stamp Barn.  It cuts up easily into three panels for a window-pane look.  The cling version sells for $12.75.  This scene was stamped in Versafine Olympia Green, onto white card stock, and some winter sky was added with blue chalk.  As always, Hero Art's ultra fine Prisma glitter (A.K.A. Stampendous' Multi ultra fine glitter) puts on the finishing touches.


Snow Writer creates wonderful dimensional snow effects and is perfect for any of your winter scenes.  The 2oz bottle sells for $2.69.  There is a foil seal underneath the screw lid and once this seal is opened, you will want to finish using the product within one to two months as it tends harden in the container.  One way of prolonging the lifespan would be to cover the bottle with a saran collar before you put the screw lid back on.  If yours is already dried up, try adding a small amount of water and/or shake it as much as you can, this is a water based product.  The stamp is from Northwoods and the water has been coloured with Twinkling H20's.  The Snow Writer itself dries a mat white so while it is still wet, you'll want to sprinkle on the ultra fine Prisma glitter for the glistening effect.  This stunning card was made by Judy Kennedy.


Martha Stewart's Snowflake Trim punch ($22.95) is a great way to accent any winter card.  The trees below are from Hero Arts.  Unseen by the computer's eye, Louise has used the Snow Writer and glitter again on the trees.


Believe it or not, Christmas will be here before we know it.  Happy stamping.

Thursday, October 7, 2010

Awesome Adhesives

Below is the perfect product if you're looking for a lightweight adhesive applicator.  I love how the tape has tiny 1/16" cuts which allows you to stop and start easily.  It has a great tack and likely the most user-friendly dispenser I've ever used.  To protect the tape end for storage, you can easily pop the cartridge out and put it in the dispenser backwards. Right now the 3 pack of replacement cartridges are discounted to $24.95.  A single replacement cartridge sells for $9.95. That's like getting the third one at 1/2 price.


This mother of all tape rolls is the best dimensional tape to raise card layers.  It does not shred when you go to cut it and it is easily doubled for a higher lift.  It will last you awhile, but it is worth investing in.


Kool Tak Micro Dots are the perfect answer to adhere vellum layers or small paper embellishments.  These tiny dots are wonderfully tacky and see-through at the same time.  You would simply press four corners of the vellum layer into the exposed dots and then apply the vellum to the card layer.  As in the picture below, simply place your punched flower onto the exposed dots, burnish gently and peel the flower off the acetate layer and place to card. This is less troublesome than using a glue pen for smaller objects.  


As far as tape runners go, this product really lives up to its name. It is extremely sticky and very easy to use and the right price at $3.50 for 8 yards.  There are no refills for this product. 


You might want to consider these products for your Christmas gift giving.  From stocking stuffers to under the tree presents, glue is both a staple and consumable for all crafters.


Couldn't leave a blog without showing you at least one card.  This is Stamp Barn's Loon.  The bird panel is raised with the foam tape. The background is just torn paper in different colours glued to a background panel and the edges are trimmed.

Happy Thanksgiving, see you next week.

Tuesday, October 5, 2010

New Deep Edge Punches


Well we blew our perfect record (since august) of posting every week. Although the blog should have gone out before our Anniversary Saturday, I'm still going to use that day as an excuse for being behind.  Thank you, thank you, thank you for all of the well wishes and your support for our continued success. Preamble out of the way, have a look at these great punches by Ek Success, the Garden Trellis is under the Martha Stewart name. 

The card above is our version of a card that Pauline Campbell made for Louise's birthday.  The trellis edge creates a dainty effect and yet is still strong enough for the card to stand. The bird on the front of this card is English Robin by Inkadinkado.


This Palm Leaf deep edge punch creates a nice lacey effect.  As above, consider backing your punched layer with another colour of card stock before layering to a printed paper. The paper is by Kaiser Craft, Utopia Collection, Idyllic.  This card is finished with paper flowers and gemstones.

See you later in the week with this week's blog, Happy Punching.

Friday, September 24, 2010

New JustRite Kits


If you are not familiar with this collection, what they offer are a combination of designed images which fit into frames that can be interchanged. You do need to purchase a different handle for the different shapes and sizes of their stamps. On each of the kit covers at the top left corner, they will state the handle size that you need.  The back of each stamp has an interlocking ribbed grid surface which locks into their handles. Be aware that this system will not allow you to use the stamps with just an acrylic block for the above mentioned reason.


These nested frames work well to layer up a salutation. The rectangle shapes work well with border punches for an additional elegant touch.  In the photo below, they've used Martha Stewart's 'Iron Gate Corner and Border punches'.

These are two of the newer design releases.  The Autumn Blessings has some lovely pictures for fall, a perfect choice for your Thanksgiving cards.
The sample below was made with Backyard Birds.  Note that this is the only Christmas bird in the set, and the rest can be used year round.  The interchangeable pieces to these sets lead to a multitude of possibilities. The Merry Christmas is from Stampabilities and the tiny pine bough is from Art Impressions (cling $4.95).  I really like this tiny bough for creating bigger branches.  I used the Clear Sparkle pen from Sakura to colour the outside ribbon on the largest frame and trimmed the ribbon frame with scissors.

Friday, September 17, 2010

Some Great Kits From Kaisercraft

This is a card that Bev did for class with one with the bird kit from the Peachy Keen collection. We all love Cuttlebug folders for adding texture, but if you choose to take it a step further, acrylic paint is a nice touch. In this card, we've used the Forest Branches folder on brown card stock and Adirondack acrylic paint dabber in aqua to match up with our card stock.

I don't know if you can see the fine design in each of the leaves and the birds chest, but each has a different pattern which really adds character to this set of stamps. The small word set below is also from Kaisercraft. I love the larger font on the lowercase 'thinking of you'. It is a nice fill for a larger space.

Here's 2 more Kaisercraft kits, a great deal at $8.25 each, and come in their own plastic sleeve that is 2 hole punched and ready for notebook storage.

We really are impressed with the quality of these stamp sets for the price. Hope you'll come in and check out the Kaisercraft images.
Happy Stamping.

Thursday, September 9, 2010

Cover A Card Background Stamps

If you're in the need for some quick backgrounds, why not consider Impression Obsessions' lovely large backgrounds. These stamps are unmounted and a whopping 5 3/4 " square. I have kept the price at $11.95 which is the US suggested price. Great value for the size of the surface. You can see all the styles available at http://www.impression-obsession.com/ . This is one of my favourites called Paisley. The sample below has been copper embossed on chocolate brown card stock. Although the picture might not do it too much justice, it is a stunning effect. I'm loving this Swirls & Stars background. It made for a quick design on the inside panel. The outside stamp and the inside verse are both from Penny Black. The small 'Happy Birthday' is from Printworks.
Although this acrylic mount was designed specifically for these Cover A Card backgrounds, don't be afraid to use them with any of your large cling or clear stamps. The price is $27.95. You will find that the ergonomic handle will make life much easier then trying to grasp a 6" square block.
Here's to better backgrounds

Thursday, August 26, 2010

Marvelous Metallic Foiling

What better way to top off a certain look for your cards then with Metal Leaf Foiling. This metallic flake product is so fine that it will adhere beautifully to tape, glue, or Palette's Stamp & Stick glue pad and re-inker @ $12.95.


For the following two cards we used the Palette glue pad. Keep in mind that this pad wants to be lightly re-inked for each stamping session. Once you have inked up your stamp and stamped it onto gloss card stock, you will need to heat it for approximately 15-20 seconds. This ink/glue is not tacky until it is heated, so it is kinder on your stamps then some other products. If you have trouble with the metallic leaf smudging it is because your ink is not dry. When your heating the ink, watch for the look to go from glossy to flat. With a brush, softly work the flakes into the adhesive and brush away extra. This coloured combination of metallic flakes is dynamite on black gloss. The stamp used in the first card is Hero Arts' Silhouette Grass.
It's easy to change your white gloss card to coloured gloss by blending a few colours of Distress Inks on the surface before you stamp and foil. The below sample was made with Faded Jeans and Concord Grape. The stamp is Iris by Penny Black.


Another way to decorate with foil leafing is by laying a strip of double sided tape to frame up an image. In this card we've used Be Creative 3mm tape as a very fine foiled border on the edges. This tape is a great value, $3.50 for a whopping 25 metres. We carry this tape in a number of different widths up to almost 5" and each roll is 25 metres long. The stamp used in this card is from a kit by Elusive Images called Tall Trees.

We presently have the above mentioned products in stock, Happy Foiling!

Monday, August 23, 2010

The Perfect Cardstock

Are you looking for the perfect base for an elegant card? Although we've had this product in for awhile, the more I use it, the more I love it. The textures include linen, and a heavier texture, all with a beautiful shimmer finish. The linen comes in white, off-white, and gold. A nice weight at 84lb. The textured comes in white and off-white and it's a bit heavier at 105lb. All of these sell for $0.75 a sheet at 81/2" x 11". To complement this cover stock we also carry a liner paper to match in white or off-white with the shimmer finish. These sell for $0.50 each at 81/2" x 11".


The embossing background used for Claudette's card is "Daisies" from Crafts-Too as well as a flourish border from the Cuttlebug Organic set.


The Organic flourish was also used on the inside paper liner.


The liner paper is much easier to punch through or emboss. On this card we've used Martha Stewart's Doily Lace border punch and Tim Holtz's Regal flourish embossing folder. We've also used Martha Stewart's water lilly punch to punch the flowers from the liner paper and used Brilliance sky blue ink to colour them and the panel behind Stamp Barn's Happy Anniversary. We finished the flower centers with another small flower punched from the liner paper and pearls.


These strips of bling are from Kaisercraft. A nice inexpensive way to jazz up your cards. There are 7 colours choices in the rhinestone strips and 6 choices in the pearl. These self-adhesive gems sell for $2.79 a package. There are some unusual colour offerings. I love the brown and caramel pearls as well as the amber / jet rhinestones.


Have fun embellishing, see you next week.